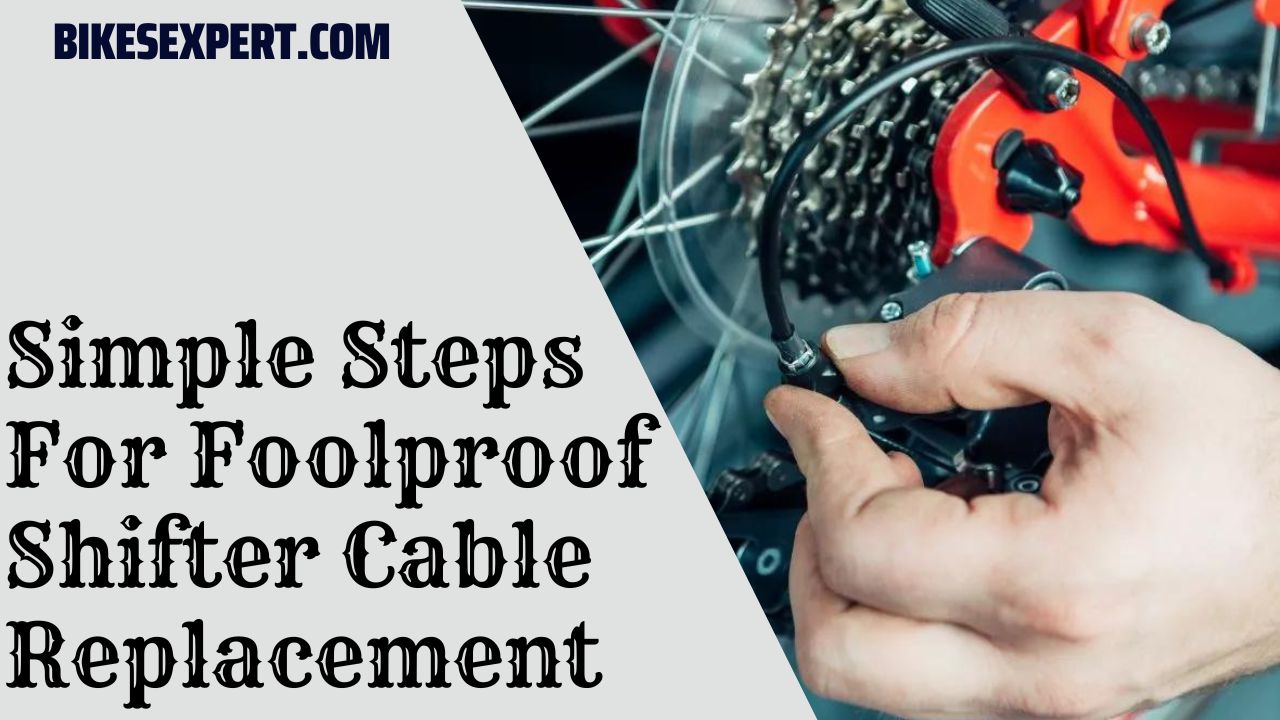
Shifting cables play a crucial role in bicycles. Shifting gears smoothly depends on a smooth drivetrain and intact rear derailleur, shift lever, front derailleur, shifter cable, and housing.
If shifting feels crunchy, the shifter cable may be worn or stuck to the accommodation. It is necessary to replace the shifter cable in such a case. In this article, I will explore
- The Types of Shifter Cable
- When should you replace a shifter cable?
- How to replace the shifter cable easily?
- How To Prevent Shifter Cable Damage? For more information, please read the article.
Also, you have to check out my post on Bike Damaged In Shipment : What Would You Do?
What Is A Shifter Cable?
Shifter cables are essential on your bike since they link the shifters on your handlebars with the derailleurs. In addition, they allow your bike’s gear shifters to function correctly.
Types Of Shifter Cables
A bike’s shifter cable depends on the type of shifter it uses, as there are two major types. There are two types of shifters: the Campagnolo shifter and other shifters different from Campagnolo. There are only two main categories.
- Campagnolo Shifter Cables
As compared to other shifter cables, Campagnolo’s have smaller barrel ends. Furthermore, they have a smaller thickness. Shimano and Campagnolo shifter cables are between 1.2 and 1.3 mm in diameter, while Campagnolo cables are between 1.1 and 1.2 mm.
- Other Shifters Cable
Shimano and SRAM use shifter cables different from Campagnolo’s. They are categorized as one because they have the same barrel ends and sizes and can be used interchangeably.
When Do You Need To Replace Foolproof Shifter Cable?
To ensure that shifting is always working correctly, you will need to replace your shifter cable. It is necessary to replace the shifter cable if:
- Changing gears is difficult for you.
- Shifting involves a slow reaction from the derailleur
- The rear derailleur doesn’t react right away when you shift gears.
Faulty cable housings and shifter cables usually cause shifting problems. Water can enter the shifter cable housing if the bike is frequently exposed to damp weather conditions, such as rain.
Shifter cables become stuck to cable housings, making them unable to move freely when shifting. This means shifting on the bicycle is now restricted since the shift lever cannot transmit shift commands timely or correctly to the rear derailleur. Your drivetrain can be easily repaired by replacing the shifter cable on your bike.
How To Replace Foolproof Shifter Cable?
It is time to replace your road bike shifter cables if they have become worn, cracked, or rusted. Here are the steps you need to follow to replace your shifter cables.
The Tool You Required To Replace Shifter Cable
- Screwdriver / Allen key
- Diagonal pliers
- Bowden cable pliers
- Shifter cable + Shifter cable housing
- End caps/ferrules for shifter cable housing
- Assembly grease
Step 1 – Unhook The Rear Derailleur Shifter Cable
- When releasing drivetrain tension, select the highest gear and shift the bike chain to the smallest sprocket.
- The shifter cable should be removed from the rear and front derailleurs. Loosening the clamp by means of the hex bolts on the derailleur is necessary.
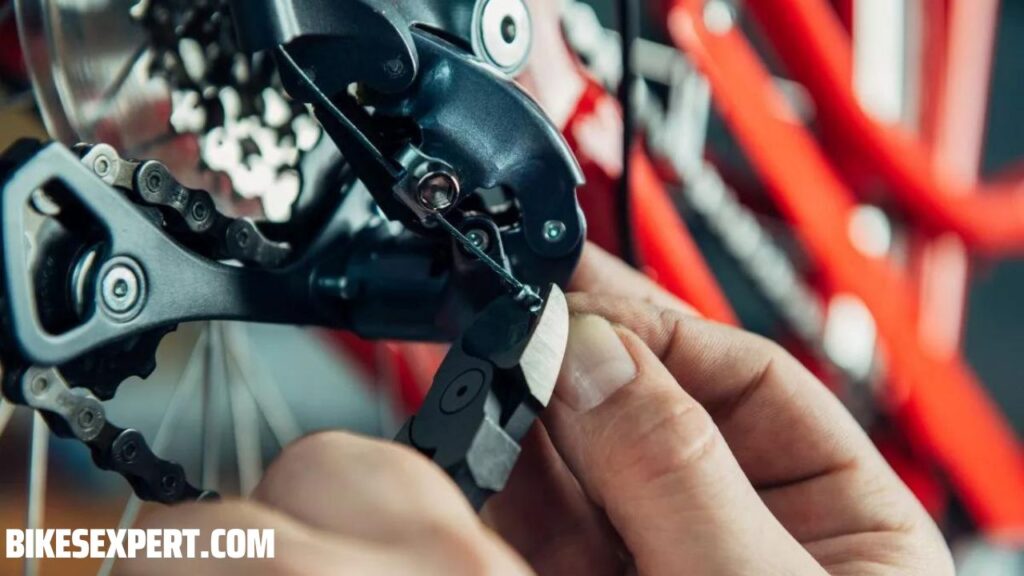
- Use a diagonal cutter to remove the end caps from the shifter cable.
- Remove the line from the derailleur now.
- Be sure to remove the shifter cable and the housing from the braze-ons on the frame of your bicycle.
- For threading the new cable correctly, remember how the original cable was attached to the frame – if in doubt, take a photo.
Step 2 – Remove The Shifter Cable From The Shift Lever
- With a screwdriver, loosen the shift lever cover bolt.
- It is necessary to shift into the highest gear before removing the shifter cable from the lever. It means pulling the little lever until there is no click.
- Make sure the shifter cable is removed from the shift lever. Pushing the released cable forward helps.
- Check the shift lever for dirt. If necessary, clean it.
Step 3 – Measure And Cut Cable Housings
- To make the new cable housings the same size as the old ones, use Bowden cable pliers.
- A pointed object, such as a needle, can open up the cable housing, which may have been crushed from cutting.
- To prevent water from getting into the cable housings, apply a small amount of assembly grease to the ends of the accommodations.
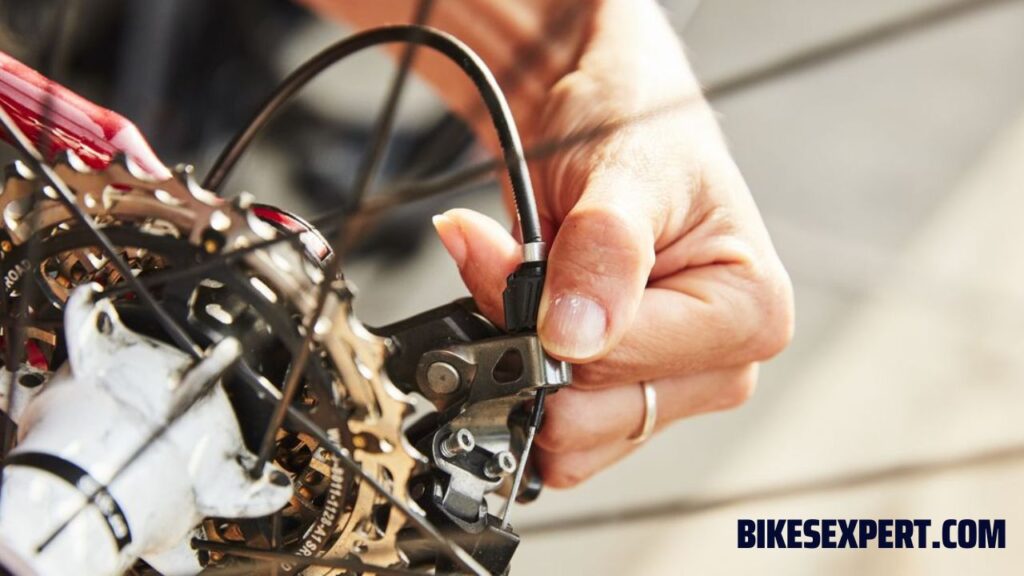
Step 4 – Connecting The Shifter Cable
- The anchor at the end of the new shifter cable should sit in the shift lever when the cable is pulled through the lever. Cover bolts should be tightened.
- Using the old housing, run the cable along the frame through the cable housing.
- Ensure that the cable has rounded curves rather than being bent. Tightening the shifter cable when the handlebar is turned to the left is not a good idea.
- Assemble the derailleur and the shifter cable. The cable should be positioned under the hex bolt in a notch.
- Adjust the hex bolt and pull the cable slightly.
Step 5 – Adjusting The Shifter Cable
- Shifter cables can be tensioned when attached to derailleurs. Change the rear derailleur sprocket to the largest. Select the largest chainring for the front derailleur.
- No adjustments are required on the next ride when the shifter cable and housing are seated correctly. Pull on the cable between two cable braze-ons.
- After shifting through all the gears, you can adjust the tension using the barrel adjuster on the shift lever.
- If the derailleur does not go smoothly, turn the tension adjuster to the left.
- By turning the adjuster to the right, you can decrease the tension if the derailleur doesn’t shift cleanly to the smaller sprocket.
Step 6 – Trimming The Shifter Cable
- The shifter cable length should be correct if all gears shift correctly.
- Use the Bowden cable pliers to shorten the shifter cable on the derailleur so that it has 2 to 3 cm leftovers and does not interfere with cycling.
- Put some assembly grease in the ferrule beforehand to prevent water from getting in. Place a ferrule on the shortened end of the shifter cable.
- Ride your bike and make sure all the gears shift smoothly. After replacing and adjusting the shifter cable, the cycle operated smoothly again.
How to Prevent Your Shifter Cable Damage?

If you maintain the shifter cable properly ,it will last for a long time. By following some simple things you can prevent shifter cable damage:
1- Proper Storage
You can damage your cables if you store your road bike in a damp place. In such an atmosphere, the cables will develop rust from the moisture they gather,spreading until damaged. Ensure your bike is kept cool and dry whenever you are not riding.
2- Maintenance
Maintaining your road bike will prevent the cables from rusting. Maintaining it is as simple as cleaning it regularly, especially after every use. Water, mud, and grime are inevitable when it’s wet. The cables rust very quickly when you don’t clean your road bike after riding.
A long ride would also cause you to sweat, and salt water is highly damaging to metal. It makes the shifter cable . For this reason, you should clean your bike before storing it. Keeping your bike cable in good condition is one way to prevent rust from forming.
3- Lubrication
By lubricating your cables often, you can prevent bike cables from damaging.The presence of lubricants prevents iron, metals, and alloys from damaging it.
Lubricant coating prevents moisture from coming into contact with metal, thus preventing damage. Keep your cables lubricated regularly, especially after washing.
4- Washing
Besides cleaning your bike after every ride, you should wash and clean your road bike at least once a month to prevent cables from getting damaged. During the wet season, you should wash your road bikes more often than once a month. Salt and grime can clog cables in the winter, especially when they are exposed to the elements.
It is essential to wash the bike carefully so that you can inspect it for other damages as well. You remove dirt and moisture from your bike when you wash it.
It would help to not store your cables immediately after washing them since the water can cause them to rust. Store it after it has dried properly.
Frequently Asked Questions [FAQs]
How long do shifter cables last?
There is no end to its lifespan. You can usually use it for five to eight years.
Are all shifter cables the same?
The shifter cable comes in a variety of types. You must purchase any shifter cable you see out there if you inspect your shifter cables and discover they are frayed, bent, or rusted. There are different types of shifters on other bikes, which means that different types of shifter cables need to be used.
Should I lubricate the shifter cables?
Today, most brake and shift cables are lined with plastic, so they do not need lubrication. Lubricate the wires in wet weather or on an older bike without plastic lining to prevent rusting.
Final Words:
Maintaining your cables is essential so your bikes can function correctly. Do routine checks to ensure they are safe to ride with. If they are not pre-lubricated, lubricate them and change them when necessary.
You can easily change the cable at home by following the above steps. Just make sure your bike shifts properly whenever you attach a new cable.
Also, make sure to check out my post on How To Replace Your Bike Chain? A Guide For Beginners.